Monday, December 12, 2016

{SUPER E!} Learning CVCe Words the FUN Way!

Good afternoon!

It is one of my favorite times of year in first grade phonics land---SUPER E time! Students LOVE learning about CVCe words and I've found that using a super-hero theme is a fun alternative to our typical "Magic E" story. Here is what we do:

I received this costume one year for teacher appreciation week (it was a super hero theme, obviously). Who doesn't love to teach with costumes?! The kids get a kick out of it! I love how such a simple thing can make a lesson more fun. You can make this costume with a simple red piece of fabric for the cape and felt pieces for the wrist and head bands. 

Here I am trying to hide my 9-month pregnant belly under a SUPER E logo:


We then watch this SUPER E video on youtube. It is so silly!


Here's another one:


We look at words using white boards, magnet letters, and star fall. Then, it is time to bust out the individual letter wands! 


This is from my Super E Center for reading and writing CVCe words. Students take a letter wand and read the word before and after Super E. They record their words on a simple recording sheet. This set has 60 CVCe words to choose from and is great to use for centers, guided reading, or as a whole-group SCOOT game!

The best part? Kids LOVE taking the letter wands home at the end of the unit. Yes, you have to laminate and glue Super E popsicle sticks every year...but it is SO worth it when you see how excited they get! It's the little things, right?

You can find this center by clicking on the photo below:


How do you teach CVCe words? I'd love to hear comments below!


Thursday, December 1, 2016

Sequencing Snowman FREEBIE!

Happy December, everyone!

This week, my students have been learning about sequencing stories after reading. I'd like to share a fun winter-themed sequencing freebie that we tried out today! (As a bonus, there's one for summarizing using B-M-E as well!) 

To introduce sequencing, I used some sequencing puzzle cards (pictured on the right) that I snagged from Target this last summer. Students assembled the puzzles in partnerships and used the words First, Next, Then, and Last to describe what was happening in the puzzle. It was a simple way for students to get used to the process!


Next I modeled with several stories that we read together using this "Sequencing Snowman!" I printed it on 11 x 17 paper for display purposes. 


Finally, students were ready to try it on their own! For first graders, I allowed them to draw pictures in the spaces. I have also done this for 2nd graders with a lined paper version. Click on the picture to download for FREE! :-)

'

Don't forget to check out my TPT shop for other fun goodies!


Saturday, October 8, 2016

Fall Favorites PLUS a FREEBIE!


 Fall is my favorite time of year, which is why it is no surprise that I had SO  MUCH FUN creating these autumn math packs! 

Cornucopia of Coins:


Students practice matching coin pictures to the written values in these fun puzzles! Can make a great center for independent practice. It also includes worksheets for continued practice and review!


Pumpkin Place Value Puzzles:


Students match standard, expanded, and written form with place value blocks!


Turkey Time Riddles:


This is one of my favorites for practicing time around thanksgiving. This multi-step process helps students practice time to the hour, half-hour, quarter-hour, and 5-minutes while solving silly riddles. (Let's be honest...who doesn't love corny jokes!?)


Fun Fall Freebie!

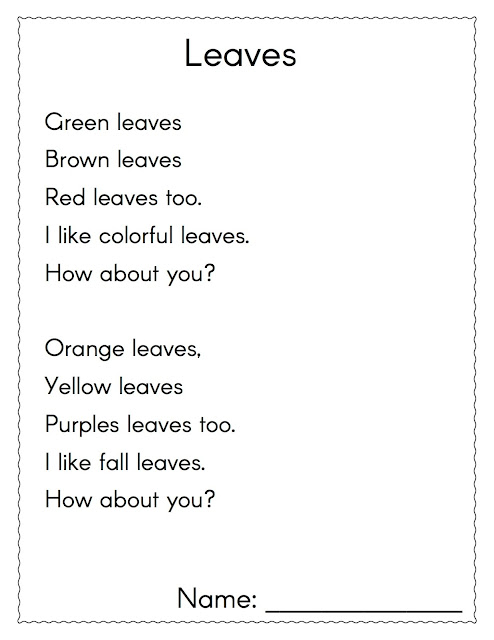
September FLEW by without us having a chance to break out the watercolors. I know how much students love painting, so I set out to find a quick and easy way to incorporate watercolors into our Friday "Smart Art" time. I found this simple poem to use for shared reading: 


To incorporate a little Science, we read the book, Why do Leaves Change Color? by Betsy Maestro.


Then, it was time to paint! Students traced cardstock cutouts for leaves. You could also search for leaves outside to trace for added fun!


Click to download!
Enjoy!


Thursday, July 21, 2016

Welcome Letter 2016

It's back to school time! Well, not quite...we still have some summer left (phew!) but it IS that time of year when I start to get excited.

Now...don't get me wrong. I love my R&R time to recharge and, to be honest, I've been so busy this summer getting ready for our new little bean in December that I haven't really thought much about school at all! I think taking a little break is healthy and necessary to be a bright, energetic presence in our students' lives. 

Anyway, before we left for summer break we needed to submit our welcome letters for the following school year. I began teaching in 2011 and really hadn't done much to my welcome letter since then. Time to revamp! 


My original letter was in paragraph format and was geared more toward the parents. I included my philosophy of teaching, etc, etc, blah, blah. I realized that who I really should be writing to is the student! I gained some inspiration from browsing some examples online and came to this. 

I LOVED the idea of including a QR code into the letter to make it more engaging. I used the QR code for assessment scheduling, but it could be used to link to a class webpage, blog, video...the options are endless!

(Note: My main inspiration was from the fabulous Jodi at Fun in First. Take a look at the link to see her example and for instructions on how to insert a QR code into your letter!)

I hope this letter can help provide some ideas or inspiration!
 What do you include in your welcome letter? Is it geared toward parents, students, or a combination of both? I'd love to hear your input!


Monday, April 18, 2016

Easy May Day Basket FREEBIE!


Every May Day, our students deliver baskets to the community with their older buddies. It is such a fun way to engage the neighbors with our school and build rapport with the community. Plus, students also reap the benefits of creating something nice as a random act of kindness to others!

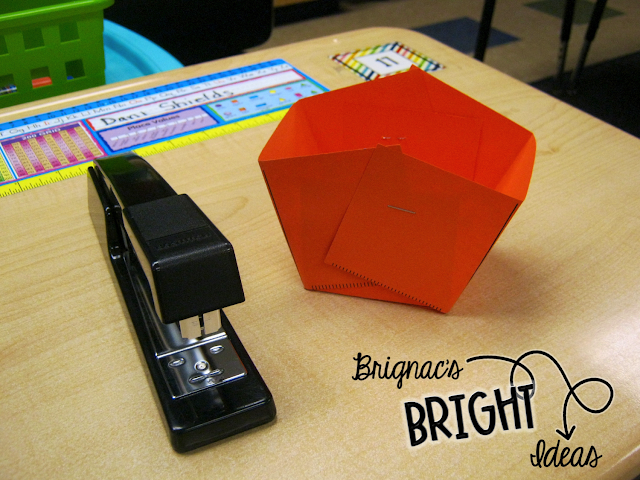
Students make the baskets a day or two before with construction paper. In the past, we would use cone-shaped baskets. I couldn't STAND how the baskets would roll around when students were trying to decorate or fill them! I scoured the internet for easy ways to create a basket with a flat bottom. That brought me to this design. 

The construction paper template includes everything you need. Make copies on a variety of colors and then use a large paper cutter to cut apart the straps, basket square, and flower decorations. The second page of the template is for basket tags, if desired.

To assemble the basket part, students make 4 cuts. ONLY 4 CUTS! It's unbelievable, really. I tell students to only cut the parts that look like "railroad tracks."

The rest of the lines are where students should fold. Make each fold in the same direction so that it can be easily formed into a basket to be stapled! 

I just have students make a line when they are ready and I give two quick staples on each side. Then, it is time to decorate! Students can choose what color flowers, handle, and basket tag they would like. They can also decorate with markers, crayons, etc.


(Click the picture to download your own copy!)


Voila! May Day baskets complete. :-)


Wednesday, March 30, 2016

Spot the Plot


This spring break, while many of you amazing teachers are off enjoying some much deserved R&R, I am at home celebrating with that nasty stomach bug that has been going around. WOO-HOO! While it is absolutely no fun, I figure teaching is the only profession where it is more work to call in sick than it is to stay home. In that case, I am enjoying getting better and resting...with NO SUB PLANS! (How's that for a silver lining?) ;-)

This also gives me a chance to catch up on blogging and TpT work while I binge on my latest guilty pleasure, Pretty Little Liars. That brings me to this post: All about PLOT!

I always like to test things out with my students before I ever share anything on my blog or store. Before spring break started, I taught my kids all about plot. In the past, I had been teaching plot as a 5-finger retell...remember this?


However, my bright bunch of kiddos were ready for more. As a looping teacher, I continually need to find ways to change up my lessons so they are fresh and new. I couldn't wait to teach them the 5 elements of plot using the roller coaster strategy! 

I started by making an anchor chart based off of my own ideas and a hodge-podge of ideas found on Pinterest. Here's what I came up with:


I put this poster up a couple of days before introducing this new way to look at plot. The kids were so intrigued! 

We came up with roller coaster actions for each "spot on the plot" and read several stories as a class to help model the strategy. Here are some of the books that I found to have simple, concrete examples of a plot line:


After several days, students were ready to try it on their own. I created this graphic organizer to match my anchor chart and printed it on 11x17 paper. The end result is like a plot placemat...so cute!


We used the story Dog Breath, by Dav Pilkey. It is perfect for this!


The students felt so accomplished at the end! 

All in all, I felt like this method of teaching plot worked very well with my class. Since I teach both first and second grade, I felt like I needed to make a simplified version for the younger kids that just includes Beginning-Middle-End. I can't wait to share it with you! 

You can find my Spot the Plot pack at my TpT shop HERE!


Friday, March 25, 2016

Recent Anchor Charts

So...After a MONTH LONG hiatus, I'm finally back! 
....Partially because it is the last work day before spring break and I am doing everything possible to avoid the daunting task of organizing my desk and part because it is just plain silly how long it has been. I really do love blogging, but this time of year gets SO crazy, amirite?!

Anyway, today's topic is everything ANCHOR CHARTS! 

When I first started teaching, I was all about using my class promethean board or finding the cutest possible printable poster for any of my teaching topics. As I continued teaching, however, I *finally* realized that:

A) Anything on the Promethean (or SMART board, whichever you use) disappears the moment you turn it off. (Crazy, right?!) Poof! The kids can't return to it and reference it throughout the year.

B) Printable posters, while they are cute and save wall space, are TINY! They are so hard to use for whole group lessons.

That's when I realized: Teachers all over the country...for years and years...have really been onto something. I purchased some chart paper and have never gone back!

I love getting ideas on Pinterest for new anchor charts, so I thought I'd share some of my recent charts that have brought engagement and success in my classroom as of late. Some are original, some have flair from other anchor charts that have been floating around Pinterest. Take a look!

PLOT


AUTHOR'S PURPOSE


WRITER'S WORKSHOP


TEXT STRUCTURE


SUBTRACTION NUMBER STORIES


I know it's a random selection, but hopefully someone somewhere finds something they like! What are your favorite anchor charts? How do you use them in your classroom? Comment below!

Wednesday, February 17, 2016

Subtraction TIPS and TRICKS {Plus some FREEBIES!}


I've always had trouble teaching this strategy, until NOW! Thanks to some AHH-MAZING bloggers out there, I have learned some tips and tricks for teaching this strategy with students.

 To start, I make sure my students have a good understanding of place value before I teach the regrouping strategy. I am SUCH a stickler for making sure my students understand WHY a strategy works before I teach it. I am usually so afraid to teach this "old school" way of solving subtraction because many times kids don't get why it works the way it does. That's why I was SO EXCITED to find an idea for using MANIPULATIVES!

Check out how the amazing Angie at Lucky Little Learners uses manipulatives to teach subtraction with regrouping:


I LOVE this because you are able to break apart the groups of ten. In the past, I've used base-ten blocks. It is so hard for kids to exchange a group of tens for ones...ugh! Thanks, Angie. This was MUCH better!

Next, it's all about practice, practice, practice. I had my kids work in partners: One student would use the unifix cubes and mat (from the tutorial above) to solve a problem and the other would track the steps on a mini whiteboard. After each turn, they would switch. We spent a long time on this, but it was SO worth it!

After some time with manipulatives, then they were ready to practice on paper. I had trouble finding a practice page with space large enough for students to show their work, so I made my own. You can grab your own FREE copy below!


In addition, I offered QR codes with tutorials and songs for students to use if they needed additional support:

Download this resource HERE!

To wrap it all up, I showed students WHY we learn this strategy by explaining that it is the quickest way to solve subtraction problems with REALLY, REALLY big numbers. To prove it, I listed a ridiculous problem with numbers in the millions and zipped through the strategy to solve it. They were AMAZED and couldn't wait to learn more! 

I just love ending lessons like that. :-) 


Thursday, January 28, 2016

Non-Food Valentines!


With Valentine's Day just around the corner, I thought I'd share some of my potential ideas for gifts for my kiddos this year. I LOVE the idea of giving some kind of non-food item in the midst of all the sugar-induced craziness, and these items can all be found on the CHEAP at Target!


(BTW...This post was inspired by the AMAZING Rachelle at http://whattheteacherwants.blogspot.com!)

Option #1: Maze Games


Handheld Puzzles: Target Party Section {18 ct for $5}

Option #2: Bouncy Balls


Bouncy Balls: Target Party Section {12 ct for $3}

Option #3: Bubbles


Bubble Necklaces: Target Party Section {12 ct for $3}

Click here to download.


I haven't decided which ones I want to make for my kiddos yet...What do you think? Comment below with your favorite!